Monday 24 June 2013

X-Wing - Millennium Falcon Conversion


One of the things I love most about the hobby is converting minis and I've completed some challenging and rewarding ones over the years. But on the night the ol' knife blade hovered above the Millennium Falcon, I felt a sense of nervousness. This would be a one way ticket, no room for error. If I screwed this up, I'd be left with a scarred chunk of resin and Han and Chewie would be lookin' for a new ride...

If you fancy converting your Falcon, read on friend :)

It was 2am and I had the head torch on. Crazy things happen in the dark...
As the knife cut in, the first thing I noticed was how thick the resin was on the Falcon. I ended up having to apply some serious pressure to cut through to the other side. Once I'd made an initial insertion, I took my time 'scoring' along the line of the cockpit access corridor and eventually the piece began to pry out. To help when handling the model, I also popped the guns off (they're on little pegs) and removed the radar dish.... It was time to hit the sack.


The next morning, I inspected the previous nights' work and was pleased to find that things were looking pretty good. I cleaned up the model with a needle file and flipped her over to get a rudimentary view on how she would look with the cockpit located down the middle. You can see from the picture above that I also toyed around with tacking the guns on the sides and added an alternate radar dish - All helps to show how different options may look...


Next job was to fill the gap left by removing the cockpit access corridor. I measured off a piece of plasti-card and carefully trimmed it down until it sat flush in the open space. I then spent a good 10 mins filing and sanding the joins down to try and create as smooth a finish as possible. A quick wash of white paint over the area helped to highlight any areas that had been missed...


I 'scored' lines on the plasti-card to represent the edges of the new hull plates and added in some assorted gubbins down the side of the ship to blend it through. I also cut some tiny squares and hexes out of thin plasti-card and added them to the new hull plates, echoing those found across the ship.


Next job was to trim back the area where the new cockpit would be attached. This could be considered as optional, but I wanted the cockpit to sit a little further back in the ship as opposed to sticking too far out the front of the ship. The gap in the middle was again filled with plasti-card, cutting two bits for the gaps down the sides and one to cover the front. A bit more sanding down and you should be left with a nice smooth finish.


The cockpit itself was also trimmed down to fit comfortably in it's new housing. You may need to skim a bit off each side of the cockpit to ensure it slides comfortably into the gap. The arch from the top of the old access corridor was also filed down ready to go into it's new position down the 'neck' of the ship. This simple touch will help tie the conversion together and ensure the new cockpit looks a little more like it was supposed to be there in the first place and not simply just stuck on the front...

'It's Alive!!!'

With the conversion finished, it was time to crack on with the paint job. From an early stage, I knew I wanted the ship to be white with a blue motif - in homage to the Millennium Falcon's previous guise as the 'Stellar Envoy'...


I've read a number of forum posts that give advice on stripping your X-Wing models for re-painting. I personally didn't feel the need to go down this route on this particular mini and as long as you don't go heavy with your paints, you shouldn't risk covering up any of the original detail. With this in mind, the model was primed with a light coat of white primer...

I reversed the top-side gun turret so the awesome looking view port could be seen in all  it's glory... 

Once the base coat was dry, I gave the whole model several washes of Citadel black ink, taking time to load a bit more ink around the recesses and engine vents. The blue motif was kept fairly simple, following the edge of the hull and cutting in along the line of the escape pods. To help make the blue really 'pop' on the model, I added some shading and highlighting around the plate joins and edges...

The underbelly of the beast...

The final element to paint was the infamous 'engine glow'! Load up some dark blue paint on your palette and slowly add in some GW 'Hawk Turquoise' and pure white. Take your time and you should be able to blend through successive highlights to give you a fairly effective finish...

YT-1300 Power!!!


I'm really pleased with how the converion turned out. If you're thinking about converting your Falcon, I urge you to give it a go. If you take your time and keep faith in your skills, you should end up with something that is both unique and looks the business on the table-top. Hopefully this post has given you some inspiration to make the first cut :)

Of course there is one more thing that needs to be done. The ship needs a name!

Hailing from the ship yards of the Corellian Engineering Corporation, I give you the 'Albion Star'

Friday 21 June 2013

Star Wars X-Wing Miniatures Game - Capital Ships

Star Wars X-Wing Miniatures Game - Imperial Star Destroyer
The corvette 'Silent Vigil' escorts Imperial dignitaries on route to Coruscant... 

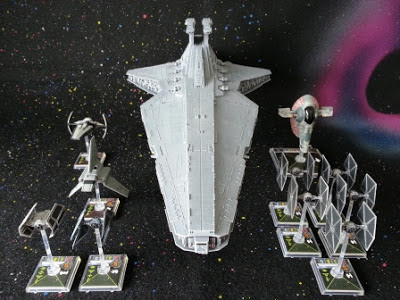
Like many of you currently playing X-Wing, I've had a real urge to bring some large scale ships to the table. Whether operating within a home brew rules set or simply acting as large scale scenery, the cinematic presence these ships provide can really help make for a memorable spectacle.

Star Wars X-Wing Miniatures Game - Imperial Star Destroyer


Scale wise, Frigate and Corvette class ships are the order of the day and in this regard Rebel players have the option of going for the Kenner Toys 'Collector Fleet' Blockade Runner. More on her in a future post...

Star Wars X-Wing Miniatures Game - Imperial Star Destroyer

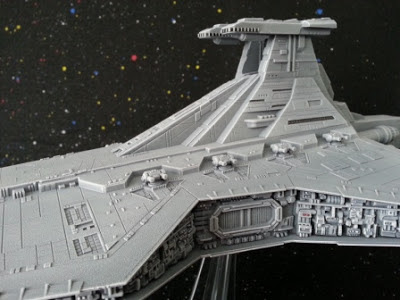
The Empire player needs to think outside the box a little but has a great option available to them in the form of the Republic Star Destroyer kit from Revell. I picked mine up from eBay for about 30 quid. Let's take a look at what comes in the box...

Star Wars X-Wing Miniatures Game - Imperial Star Destroyer

The kit was straightforward to put together, taking around an hour including time for clean up and prep. Once the kit was built I needed to think about basing it and in this regard, the GW large flying stand presented itself as a good solution.

Once a balanced 'center' of the model had been determined, I marked out the outline of the stand and drilled holes along each length of the cross to bore out the required space, sharpened up the remaining edges with the ol' hobby knife and finally neatened it all off with a bit of sanding using a needle file. The end result means the ship simply slides onto the stand for gaming and can be removed for ease of transport and storage. I'm still weighing up the options for the stand's base itself - Ideally incorporating some play-tested ship stats / firing arcs etc.

Star Wars X-Wing Miniatures Game - Imperial Star Destroyer


Paint wise, the model was undercoated with Army Painter 'Uniform Grey', airbrushed up with a couple of lighter coats and then given a final dry-brush of pure white. I wanted to keep any detailing fairly simple and so picked out a few white lights down the flanks with red lights next to the docking bay doors. I also wanted some sort of scale reference, so I picked out windows and viewing ports down the main turret and bridge, painting them in black and varnishing them with ard' coat...


Star Wars X-Wing Miniatures Game - Imperial Star Destroyer
Can anyone else see Jar Jar Binks in this picture...?

So what do we know about Imperial Corvette and Frigate class ships within the Star Wars universe and how can they inspire some narrative and mission ideas within our games of X-Wing? 

‘The Vigil-class Corvette is a heavy corvette for escort, reconnaissance, and utility duties of the Galactic Empire. Often classified as a frigate, the Vigil-class is designed for patrol and escort duty.’

‘An extensive radar array is used to intercept signals and triangulate enemy positions. Double laser turrets with fast track targeting are installed on both the dorsal and ventral hulls. A small hanger on the ventral hull could house up to sixteen starfighters. Normal deployment was a mixed squadron of recon, light bomber, and Interceptor fighters. Two tractor beam projectors are used to capture smaller ships for boarding. A small company of stormtroopers act as both security for the Vigil-class Corvette and assault troops when boarding captured vessels.’


‘Many of these Vigil-class Corvettes were used by the Imperial Security Bureau as heavy transports for ISB Officers. These ships also served as command vessels for Sector Police and assisted in operations with customs enforcement.’

All sounds very inspiring :)

Star Wars X-Wing Miniatures Game - Imperial Star Destroyer
'Run Rebel, run Rebel, run, run, run...'

Well, I hope you enjoyed our look at the 'Silent Vigil' and felt inspired to bring some large scale ships to your games of X-Wing. Next time we'll take a look at the first ship to make an appearance in a Star Wars movie - The 'Tantive IV' :)


Wednesday 19 June 2013

Star Wars X-Wing Miniatures Game - DIY Asteroids!

Tycho and Arvel negotiate a route through the densely packed asteroid field...

....Only to realise Boba Fett is still hot on their tail...
Hi there, today we're gonna look at making asteroids for your games of X-Wing. Asteroids add a great tactical dimension to the game and look great on the tabletop! You can of course buy a set of asteroids straight from the box, taking the Gale Force 9 set as an example. But at around £30 for a measly 8 asteroids, you're not really getting much value for your money...

So if you fancy making your own, this is what you'll need: 

 - Hobby Knife
 - Hand Saw
 - Metal Ruler
 - Hand Drill
 - Brass Wire Rod
 - Round 25mm Mini Bases
 - Some small coins
 - Black, Dark Grey and White Paint
 - Super Glue
 - Wood Glue
 - Insulation Board (ideally the high density pink/blue stuff, but the yellow stuff will work just as well - grab some from a skip ;) )

Step 1:
Using the hand saw, cut the insulation board into rough cube shapes, generally around 1.5 to 2in sq. You'll be hacking away around a 1/3 of the foam to make your asteroid shapes so bare in mind you don't end up with too smaller blocks!


Step 2:
Grab the metal ruler and start hacking away at the blocks. Dragging the ruler towards you across the sides of the block produces great results and removes 'divets' of foam whilst leaving natural looking results (certainly better than any cuts with a knife)

You'll end up with quite a bit of waste, so best do this outside...

If things have gone to plan, you should end up with a bunch of asteroids of varying sizes...


Step 3: 
Now it's time to base the asteroids - Having chosen a drill bit that matches the diameter of your metal rod, grab your hand drill and drill a hole in the center of your 25mm round mini bases. Don't worry about drilling all the way through as you're now going to superglue a coin to the underside of each of the bases. This acts as both a 'stopper' to the brass rod you're going to glue in next and also importantly adds some weight to ensure your asteroids stand up nice and straight on the table top...


Step 4:
Now cut varying lengths of brass rod at around 2 - 3in long. Superglue one end into the hole in the base you'd drilled out earlier. At this stage, I'd recommend leaving them for an hour or so to ensure the brass rod has time to firmly set in place. When you're ready, push the rod end into the asteroid to create a guide hole. Slide the rod back out and now cover it with a small amount of wood glue. Using wood glue is important because it won't melt the insulation foam! Pop the asteroid back on and leave to dry for at least 24hrs - Wood  glue will take some time to dry inside the foam and you don't want the asteroid spinning off the rod at dry brush stage ;)


Step 5: 
It's now time to crack out the paints - Start by painting the asteroid with a dark grey colour. You will need several coats as the foam will suck the paint in but it will also help the asteroids stand up to any gaming wear and tear. Once your base coat is dry, you can dry-brush this directly with white for some quick and effective results. You may want to consider other shades such as a brown wash to give a bit of warmth to the rock, but the simple approach still does the trick. Finally, paint the rod and the stand black and leave to dry...


Well, there you go, some simple and effective asteroids for your games of X-Wing. 

Happy hunting ;)


Related Posts Plugin for WordPress, Blogger...