Tuesday, 24 October 2017
Star Wars Legion - Tatooine Table - Part 10
A pic of all the buildings made to date. This is on a 4x4 ft table. It may make for some fairly tight games if a few extra barricades / obstacles were added down the two main thoroughfares. Maybe not the best hunting grounds for speeder bikes ? ;)
The position of the two larger buildings (landing bay / canteen) on opposite corners of the board may also see opposing forces taking advantage of the elevated rooftops to draw favourable lines of sight.
I can already envisage another board / buildings being added to the south of this set up, expanding the table to 6x4 ft... This would make for a large city fight board with lots of alleys and tactical considerations...
Until next time :)
Star Wars Legion - Tatooine Table - Part 9
Two more buildings for the Tatooine table. I think these are going to be the last two for now...
Both buildings have removable roofs. These will be magnetise prior to painting...
Until next time :)
Star Wars Legion - Tatooine Table - Part 8
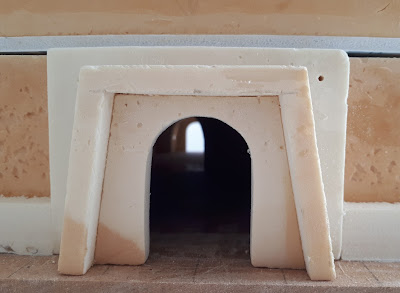
Created a proto-type door for the Tatooine buildings...
Initial thoughts; Not bad for a first attempt. One of the biggest challenges was bending the archway into shape. I used a hairdryer to heat the plasticard, but it takes some time to get the desired curve. The rest of the shapes were fairly straightforward to cut out. There may however be a simpler solution for slats on the inside of the arch; I note you can buy plasticard sheets with this type of design pre moulded... The biggest considertion I have at this stage is that I'll need to build around 9 or so doors. And whilst I'll scratch build them all individually if needs be, I've also been investigating the option of creating molds and casting the doors to save time...
Decisions, decisions... :)
Saturday, 21 October 2017
Star Wars Legion - Tatooine Table - Part 7
Two more buildings for the Tatooine gaming table :)
Like the larger cantina / market building from the last post, I decided to make the roofs removable to allow minis to be placed inside...
And here's the second building;
Until next time :)
Friday, 20 October 2017
Star Wars Legion - Tatooine Table - Part 6
After making towers, I wanted to go back to making a building that would provide some interesting options for in-game mini movement and cover...
I envisage this building to be a cantina or market bizarre, full of shady corners and even shadier characters...
I designed the building so that it each floor could be removed, allowing for access for minis during gaming and opening up the available gaming space. I will magnetise each component to keep the structure rigid during play...
Until next time :)
Thursday, 19 October 2017
Star Wars Legion - Tatooine Table - Part 5
I've made another tower for the Tatooine gaming table...
I like that the design stands out from the majority of dome topped buildings that are synonymous with Tatooine building design. It certainly has a 'castle tower' feel to it, which makes me wonder whether it's some sort of govermental or garrison type building...
Until next time :)
Wednesday, 18 October 2017
Star Wars Legion - Tatooine Table - Part 4
No Tatooine gaming table would be complete without the addition of a moisture vaporator or two :)
I considered a number of different materials with which to build the vaporators and the one that provided the best solution was.....Lego! :)
A selection of plasticard and bits box pieces were added for final detailing...
Until next time :)
Star Wars Legion - Tatooine Table - Part 3
Sanding wise, I use a 3M sanding block / loose sanding paper and a handy sanding stick! - Basically sand paper wood glued onto a 1cm depth ruler-like lenghth of hard wood. This has proved invaluable for the majority of sanding I've done, providing great control and enabling large flat sweeping sanding, the ability to shape good quality curves, as well as used for more accurate scoring or angled sanding...
In terms of cutting, the retractable knife has done most of the leg work. The foam can blunt blades pretty quickly, so it's worth stocking up on extra blades. Other knifes and saws are also handy for bigger cuts where initial accuracy isn't needed. I've also used a chisel for gouging out unwanted foam as well as smaller files for tidying up any small details, for example, round the door frames...
And to bring it all together, the trusty wood glue...
Until next time :)
Subscribe to:
Posts (Atom)


